
Have you ever faced the frustrating experience of a malfunctioning electrical component in your 2005 Mercury Mariner? A blown fuse can be the culprit, causing everything from a dead radio to a non-functional headlight. Understanding your vehicle’s fuse box layout and diagram is key to quickly identifying and resolving these issues. This comprehensive guide will walk you through the intricacies of the 2005 Mariner’s fuse box diagram, empowering you to tackle electrical problems with confidence.

Image: mydiagram.online
The fuse box diagram serves as a visual map, revealing the specific location of each fuse and the electrical circuit it safeguards. It’s an essential tool for any DIY mechanic, allowing you to pinpoint the root cause of an electrical problem and replace a blown fuse with ease. Knowing where each fuse is located and what it controls saves you time, effort, and potentially costly repairs at a professional mechanic.
The Importance of the Fuse Box Diagram
Understanding the fuse box diagram is like having a roadmap to your vehicle’s electrical system. It provides you with:
- Fuse Identification: The diagram details the location of each fuse within the box, making it easy to find the one associated with the malfunctioning component.
- Circuit Mapping: It shows which electrical circuits each fuse protects, helping you identify the exact component affected when a fuse blows.
- Amperage Rating: The diagram lists the amperage rating of each fuse, allowing you to select the correct replacement based on the circuit’s needs.
Locating the Fuse Boxes in Your 2005 Mercury Mariner
Your 2005 Mercury Mariner features two primary fuse boxes:
1. Under-Hood Fuse Box
This fuse box is located beneath the hood, typically near the battery. It houses the majority of the vehicle’s essential electrical circuits, including:
- Engine control
- Headlights
- Tail lights
- Power windows
- Radio
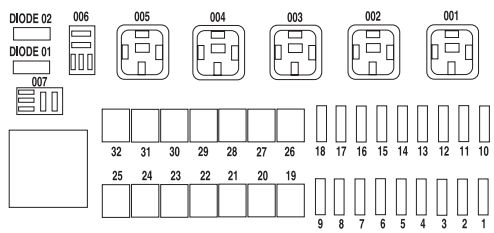
Image: www.autogenius.info
2. Passenger Compartment Fuse Box
This fuse box is located within the passenger compartment, usually near the driver’s side footwell or dashboard. It primarily protects electrical circuits related to:
- Interior lights
- Climate control
- Power outlets
- Sunroof
- Audio system
Decoding the 2005 Mercury Mariner Fuse Box Diagram
Understanding the terminology on a fuse box diagram is critical for accurate interpretation. Here’s a breakdown of the key elements:
1. Fuse Numbers
Each fuse is assigned a unique number for identification. This number is essential for cross-referencing the fuse with its corresponding circuit on the diagram.
2. Circuit Descriptions
The diagram will list the electrical components or circuits protected by each fuse. These descriptions can be specific (e.g., “Headlights”) or more general (e.g., “Interior Lights”).
3. Amperage Ratings
The amperage rating of each fuse is typically listed next to its number. This rating indicates the maximum amount of current the fuse can safely handle before blowing. Selecting the correct amperage replacement is crucial to prevent further electrical damage.
4. Fuse Location
The diagram will often include a visual representation of the fuse box, outlining the physical location of each fuse within the box. This helps you quickly find the desired fuse.
Troubleshooting Electrical Problems with the Fuse Box Diagram
Here’s a step-by-step guide to diagnosing and resolving electrical issues using your 2005 Mercury Mariner’s fuse box diagram:
1. Identify the Symptomatic Component
Determine which electrical component is malfunctioning. For example, if your headlights don’t work, you know the problem is related to the headlight circuit.
2. Consult the Diagram for the Corresponding Fuse
Locate the fuse number associated with the malfunctioning component on the diagram. For example, the Headlights fuse might be number 10.
3. Inspect the Fuse
Open the fuse box and carefully remove the fuse corresponding to the suspected circuit. Inspect the fuse for signs of damage: a blown fuse will have a broken filament, often appearing as a melted or charred metal strip.
4. Replace the Blown Fuse
If the fuse is blown, replace it with a new fuse of the same amperage rating. Always use fuses specifically designed for your vehicle. You can find replacement fuses at most auto parts stores.
5. Test the Circuit
After replacing the fuse, check if the symptomatic component now works correctly. If the problem persists, there might be a more complex electrical issue requiring professional attention.
Additional Tips for Fuse Box Maintenance
Here are some extra tips to keep your 2005 Mercury Mariner’s electrical system running smoothly:
- Regular Inspection: Periodically check the fuses in both fuse boxes, even if you’re not experiencing any electrical problems. This can prevent potentially dangerous situations caused by worn or faulty fuses.
- Correct Amperage: Always replace blown fuses with new fuses of the correct amperage rating. Using a fuse with a higher amperage can lead to overheating and electrical damage.
- Avoid Overloading: Don’t overload the electrical system by connecting too many devices to the same circuit. This can strain the fuses and lead to overheating or damage.
2005 Mercury Mariner Fuse Box Diagram
Conclusion
The 2005 Mercury Mariner’s fuse box diagram is a powerful tool for diagnosing and resolving electrical problems. By understanding its layout and decoding its information, you can quickly and safely identify and replace blown fuses, ensuring your vehicle’s electrical system operates smoothly. Remember to always prioritize safety and consult a qualified mechanic if you are unsure about any electrical repairs. With the knowledge from this guide, you can confidently tackle electrical challenges and enjoy a reliable driving experience.


